Showing posts with label tutorials. Show all posts

Monday, July 23, 2012

DIY Baby Carrier II: The Baby Backpack!

What is more fun than babywearing?! Ok, maybe a lot of things....BUT if you make your own baby carrier, it can be a lot more fun. This tutorial is a little more advanced than my basic baby carrier but it is still super easy!

I present to you the Baby Backpack


All you need is a child sized back pack and a pair of  scissors.

1. Select a child-size backpack. I found this at Value Village for $3.00.


2. Cut holes in the bottom. The holes should be about a hand's width apart. And make sure they are wide enough to fit your baby's legs through. Wouldn't want to cut off circulation, would we?


3. Insert baby.


This can be worn on the front....Or even on the back:


Don't let the face fool you. Ryan loves it.


Isn't that cute? All those moms with fancy-pants wraps at the playground will be so jealous!

Thursday, July 19, 2012

Hooded Pool Robe!


We discovered an awesome new park near our house: an outdoor heated kid's wave pool! It also has a little circular pool for tots and a BATH warm (which is much warmer than normal "heated" pools) splash pool with pool toys, stationary water guns, and fountains. It is so amazing. And since it's run by a nearby city, it's amazing affordable. Kids 4 and under, get in free (JACKPOT!).

I've only known about this park for a week and we've been there twice already. The first thing Jacob says when he wakes up is "Can we go to the pool park?" And the last thing he says before bed is, "When we wake up, can we go to the pool park?" Obsessed? Yes.

Using a pattern I came across on Pinterest, I made Jacob a Spiderman pool robe just for the "Pool park." I made my own little changes and added a hood. When Jacob saw it (and the Spiderman applique) he freaked out. I took photos of my crafting so that I would remember how to make more in the future. This is my first tutorial, so bear with me!

Materials:
  • 2 bath towels
  • scissors
  • pen
  • sewing machine
  • fabric for applique
  • bias tape
  • buttons/snaps
1. First, find two beach towels. I got these at Fred Meyer for $2.50 each! Score! Cut each towel to the desired length. I made our robe 30 inches long and it was perfect for him- he's about 40-42 inches tall. I used one of Jacob's t-shirts to determine the length. Then I folded each towel in half, lengthwise, and cut.


 Save one of the scraps ("remnant pieces") to use later to make a hood.


2. After you cut both towels, place the towel pieces on top of each other so that the hems are lined up. The hem will become the bottom of the robe.


3. Mark a t-shape on the towel to form the basic shape of the robe (see red marks in photo below). I started with the measurements suggested in the other robe tutorial and played with them a little to come up with the following measurements (note that every towel brand will come in different sizes):


4. After you draw the pattern, cut.


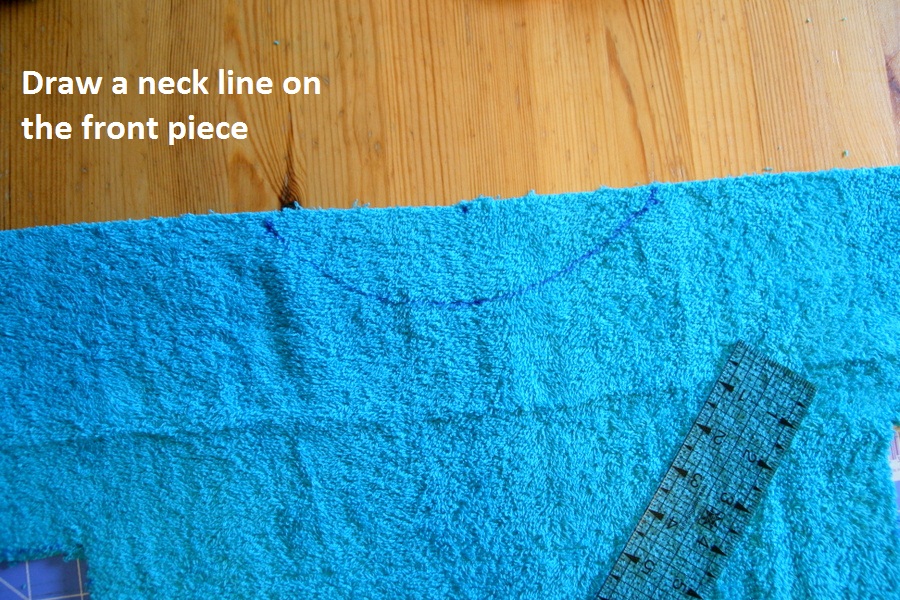
5. To make the neckline, start with one piece of towel. This will be the front of the robe. Measure a semicircle neckline shape about 8 inches across and 2 inch from the top.


6. Now make a similar neckline shape on the other towel piece. This will be the back of the robe. Make this one 8 inches across and only 1 inch from the top. 


7. To make the hood, grab one of the scrap or remnant pieces. I cut about 2.5 inches off the side so the the total side measured 22 inches long. The hem piece (the left side, in the picture shown) will be the part of the hood that goes around the face.


 8. Then fold the piece in half, keeping the hem piece to the left. Measure along the bottom. It should be at least 8 inches long to match the necklines. You may want to add an inch or so. For some reason, I didn't make mine long enough- I think my neckline ended up longer than 8 inches wide.


9. Sew the back of the hood (the opposite side of the hem and marked in the photo below with red marks), you ca sew a straight line or give it a slight curve.


 10. Cut the front piece of the robe in half.


11. Sew on any decorations or embellishments.

 
It helps if you have a cute little helper :)


He wanted to get in on the sewing action.


 12. Turn one of the front piece so that the back is facing up (the embellished side will be facing away) and place it on top of the back piece. Match the pieces up along the sides and sew as shown by the red marks in the photo.


13. Do the same for the other front piece.


 Then turn the pieces ride-side-out.

 It's coming together!

14. Add the hood. Open up the hood like shown in the photo below and piece the bottom of the hood along the neckline. Pin it in place, wrong sides together, and sew. Like I said, my hood was too short to cover the entire neckline, so I just centered it and hemed the rest of the neckline that wasn't covered by the hood. If your hood is a little bit too long, then sew the ends first. You can gather the extra fabric in the back and make a pleat or two.


15. Now just add bias tape (or you can just turn the edges in and sew a hem) to both front sides where the robe opens. Add snaps or buttons. Finish the embellishment details.


And you're DONE. Ta-da!!


I want to make one for me now!

Tuesday, July 17, 2012

Birthday Ideas For Dad

My dad turned 60 today. Yikes! For his birthday, I made his favorite cookies-- Oatmeal Raisin. But I couldn't help throwing a little pun in there.....


And, of course, what's a birthday without a little practical joke?


The laughter will help keep him young at heart, right?...At least it will ease the pain of getting older.

Wednesday, July 11, 2012

DIY {Redneck} Sprinkler

Nothing says summer more than half naked children running through a sprinkler. Oh, and an ice cold bottle of beer. But not together, of course. Silly kids, beer is for Mommy.

That reminds me of the time when two-year-old Jacob grabbed a beer off our shelf and said, "Mommy are you sick? I brought your medicine." Don't look at me. I have NO IDEA where he learned that.

Anyway, back to summer. Today was so amazingly, gloriously hot. So hot that nothing was going to keep me from running through a sprinkler. Not even the fact that we didn't HAVE a sprinkler. So I made my own! This is where the redneck part comes in....


1. Find a bottle of soda. Guzzle it down. (We only had club soda, we're fancy like that. Oh that reminds me....Daddy, fyi you're all out of club soda.)

2. Take your empty bottle and poke holes all around the sides. At first, I tried using a drill, didn't work. But those fancy things you put on the end of ears of corn worked.

3. Next, grab a roll of duct tape. You should ALWAYS be well stocked with duct tape. No excuses. Duct tape = a mom's best friend. It's also your redneck membership card. I've even seen that stuff take off warts!

4. Go outside and tape the opening of the bottle to the end of a hose. Helpful Tip: make sure your tape extends at least three inches from the end of the hose or else the pressure from the water may shoot your bottle across the lawn like a bullet....I learned the hard way. :)

Finally, turn on the hose and watch for rainbows!


If only they sold beer in plastic bottles...

Tuesday, June 12, 2012

Beach Sand...Sans Beach

I haven't been tempted to venture outside since our week of rain and clouds at Lake Chelan. But keeping an energetic 3 year old occupied in a 900 square foot house is no easy task. Last night, I ran across a fun activity on Pinterest and, once I discovered I had all the ingredients, did not hesitate to try it out!

We mixed some flour and baby oil together and ta-da! Moldable sand! If you have ever been to a children's museums or indoor play center, you may have encountered it before. This stuff feels awesome, it's like crack for your fingers. Oh yeah, Jacob liked it too.

First it was a home for his dinosaurs.


Then it became a construction site.


Then we went a little crazy, filled a storage bin full of the stuff and took it outside (things were getting a little messy!).


Jacob played with this stuff for 2 hours straight! Then right after his nap, he requested to go outside and play with it some more.

This stuff feels so awesome. Admittedly, during Jake's naptime, I went outside to play with it myself..... But look, it's both crumbly AND moldable!


 Not so awesome: the mess it leaves behind. Definitely an outside toy!


Don't worry daddy, we cleaned it up (mostly) before you got home.

How to make it:

1) Measure 12 cups of flour into a large bin (or bowl)
2) Add 1.5 cups of baby oil (I found a use for all the baby oil I got at my baby shower!!)
3) Stir it all up with your hands and crumble the mixture until well combined.

If it's too crumbly to form into a ball, you may want to add more baby oil. Oh yeah, and the baby oil smells AMAZING! It's crack for your nose (um, you know what I mean).